Showing posts with label Tape Mani. Show all posts
No comment yet

Happy Valentine's Day!

Today we wanted to show you our Valentine's Day manis :)

Ericka's:  She started with 2 coats Zoya Kennedy and then topped it with a coat of Essie Good To Go.  Next, she stamped cheetah print with Orly Liquid Vinyl on all the fingers except the ring fingers and thumbs.  After the stamping dried, she used Ulta Non-Stop Red to add little dots of color to the cheetah print.  On her ring fingers and thumbs, she folded a piece of tape in half and cut out half a heart.  After unfolding it, she stuck it on her nail and used OPI Black Shatter to paint it in.
Brittany's:  I started with 2 coats of Ulta Non-Stop Red on all of my nails.  After adding a coat of Essie Good To Go, I used the same cheetah print stamp with OPI Pink Friday on all my fingers except my ring fingers.  I also added Ulta Glitter Top Coat dots to the dots on my cheetah print.  On my ring finger, I stamped with one of my new Red Angel plates with OPI Alpine Snow.  I also added Ulta Glitter Top Coat to my ring fingers.


Jen's:  She started with 2 coats of Essie Watermelon on all her fingers except the ring fingers.  Next, she used her dotting tool to add 2 dots of Essie Raise Awareness to all her fingers, but on the ring finger she did the opposite, with Essie Raise Awareness on the nail and 2 dots of Essie Watermelon.  She topped everything off with a coat of SV.
 Hope you like our manis!  Have a wonderful day!

~Nailed by Brittany, Ericka & Jen~
1 comment

Crooked Crackle

I've been wanting to try a diagonal crackle mani for quite some time and finally got around to doing it this weekend. I had already been wearing Orly - Velvet Rope for a day and was too lazy to take it off, but wanted something new.

With the Velvet Rope already dry, I was able to jump right into taping. I cut strips of tape and placed them diagonally on each nail. I decided to use OPI - Silver Shatter as the diagonal crackle. I haven't used crackle in quite some time and was pleasantly surprised by how well it worked. I usually don't love the OPI shatters (I prefer the Pure Ice ones instead), but it did the job for me. After topping this with SV, I wanted a little something else so I added in a black line from a nail art brush.


P.S. Brittany and I have been swatching nail wheels like crazy the past week or two with all of our polishes. Once we finish it up, we'll share our collection with you :)

~ Nailed by Ericka ~
6 comments

DS Rock Solid Explosion

For today's post, I've decided to revisit a mani from my past. Back in August (I miss those days), I attempted my very first "explosion" tape mani. Thanks to the wonderful guidance of Jane over at Nailside and her awesome tutorials, I was able to somewhat get the desired effect. After a few more months of practicing my techniques, I decided to try again.One of the main reasons I decided to try this again was that I had already been wearing OPI - DS Extragance and did not want to take it off :) It is such a beautiful color and I love the way it looks in the sun!

Once I decided to try the tape mani, I started prepping by cutting out triangles of tape. I needed 6 triangles per finger. I made sure to un-stick-ify the tape and carefully set it out on the edge of the table. Since by base color was already dried from the day before, I was able to start right away. I placed three triangles on each finger and painted one coat of Ulta - Scene Steeler. I have used this color time and time again. It has great coverage and works great for tape manis or stamping. I helped this layer dry quickly with some SV. For the top layer, I added three new pieces of tape on top of the silver pattern and painted a coat of Orly - Rock Solid. Again, I topped with SV.

I tried taking step-by-step photos to show you how I did this, but check out Nailside. Her tutorials really are so helpful!


Happy Tuesday :)

~ Nailed by Ericka ~
2 comments

Triangles Reconsidered

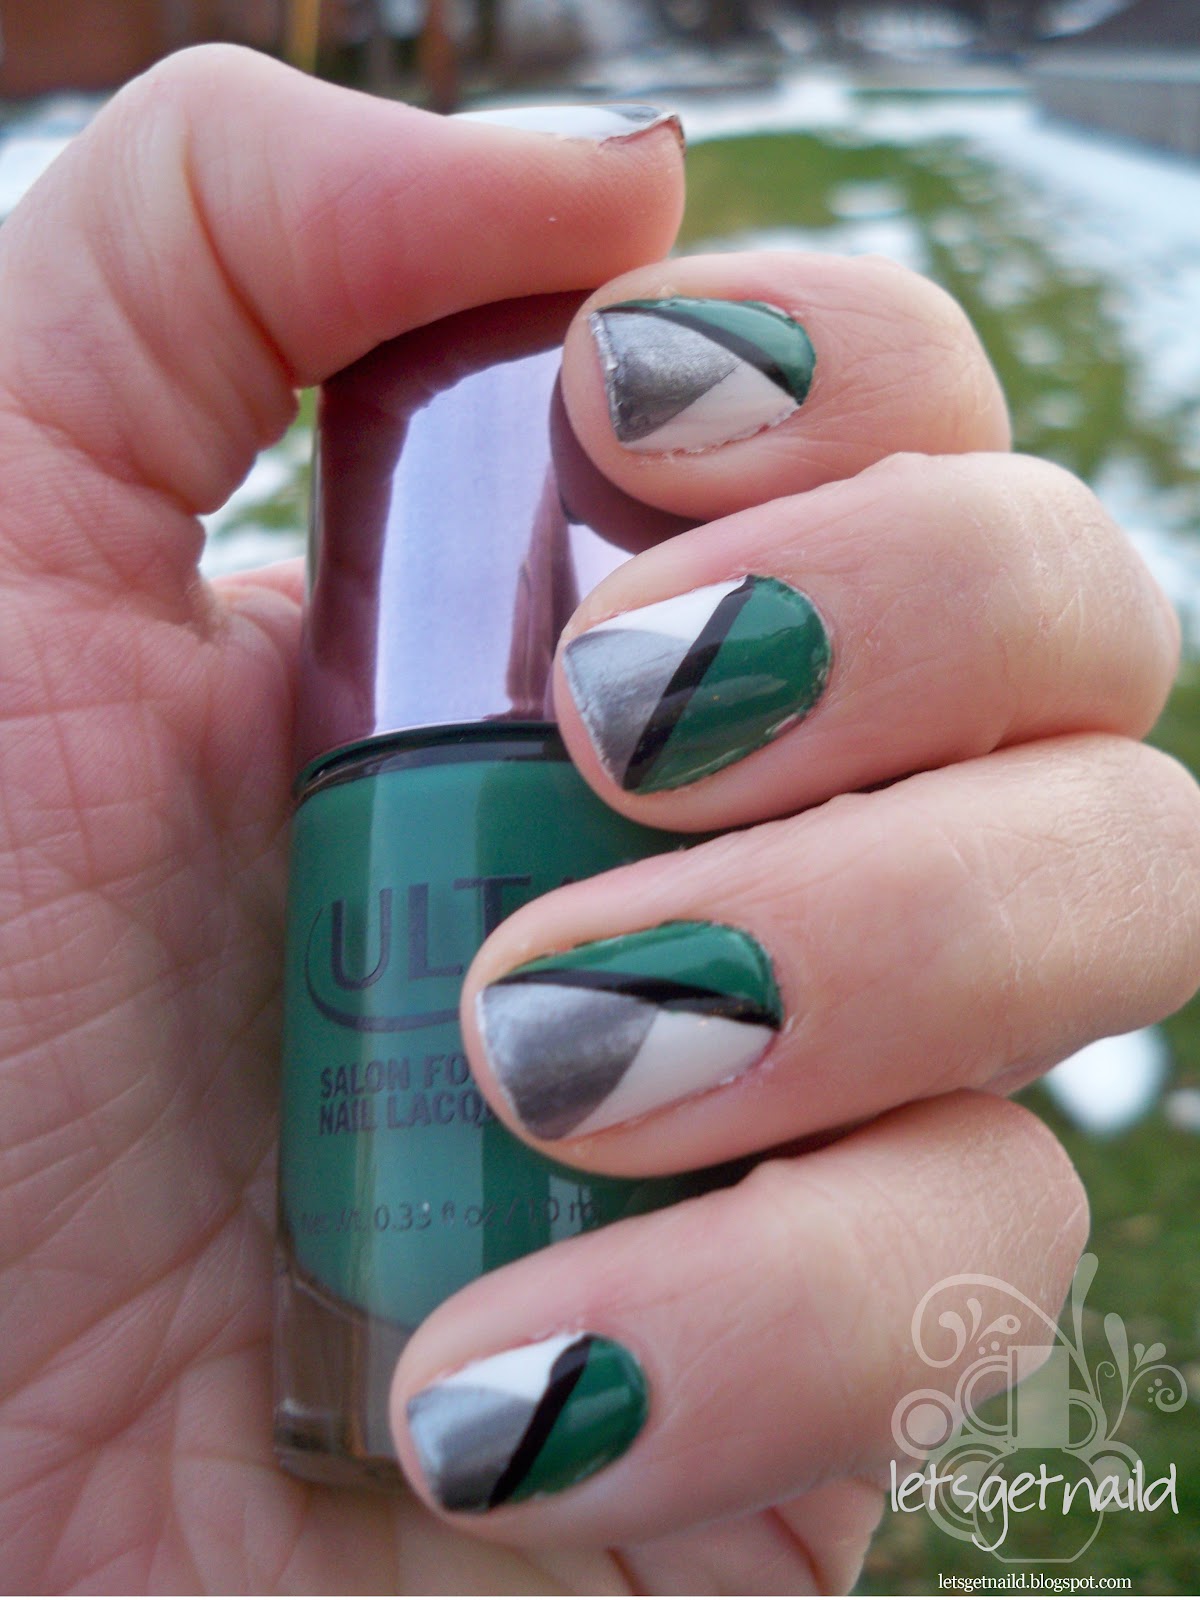
My mani for today is the result of plans gone wrong. I had intended to create a triangle mani (kinda like Jen did here). However, I was a little impulsive and didn't really think things through when I started so I had to change plans half-way through.

I started off with a base coat of OPI - Alpine Snow. This is by far my favorite white polish. It is opaque in 1 coat and has a great application. I put a coat of Seche Vite to quickly dry this layer. The next part of my design was to add the first triangle with Ulta - Scene Steel-er. I absolutely love this silver. It is a great one-coater that is perfect for stamping and tape manis.

Now, here's where I goofed... I didn't put the tape for the triangle up high enough so there wasn't enough space for the second triangle to be painted on as well. Luckily, Brittany was nearby and suggested I add in green on a diagonal and I went with it. I added in Ulta - The Jungle Look on a diagonal that matched up with the edge of the silver triangle. I just recently picked up this color and can say I'm pretty pleased with it. I finished the look with black nail art pen and a final coat of SV.
Ignore my horrific clean-up... I was feeling lazy.


~ Nailed by Ericka ~

2 comments

Candy Cane Mani

Happy Holidays!
This past weekend, I was inspired to attempt a candy cane design. I must say that I'm pretty impressed with myself :) I successfully transferred an idea from my brain to my nails! Hooray!

I started off this mani with 2 coats of a no-name polish from Claire's. It is a white shimmer glitter that comes in a flower-shaped bottle. I probably could have used a base coat in white or pale pink, but I was satisified with the slight VNL that still showed through. Once this completely dried with a layer of SV, I cut out strips of tape in varying sizes. I placed the strips on my nails and covered with Barielle - Coco Bar. I had picked up this color from Ulta on the discount rack and it is a great Christmas shade. As usual, I added a second coat of SV to seal in the design.

Unlike most manis, I'm still wearing this 2 days later! I just can't seem to take it off. I love the way it turned out, and it makes me feel so festive :)


These photos really help it feel like Christmas with a snowy background! Happy Holidays :)

~ Nailed by Ericka ~

1 comment

Electric Star

I've decided to show you one of my favorite go-to mani's. When I'm looking for something to add a little something extra to my nails, but I don't have a lot of time, I resort to tape mani's. The easiest and quickest mani I've tried with tape is diagonals. The tape is quick to cut and I love the result.

I started with two coats of OPI - I Want to be A-lone Star. This polish is from the OPI Texas Collection. It is a grayish-blue with a hint of shimmer. It was opaque in one coat, but I usually always add another for good measure :) I added SV Top Coat for a quick dry (still on the hunt for that 3-free quick dry).

With the tape, I added diagonals with Nails Inc. - Electric Lane Holographic Glitter Top Coat. I picked up this top coat at Sephora a few months ago and love the way it can change the look of polishes! I added another coat of SV to seal in the holographic glitter and give the mani a smooth finish.


What your go-to when you're short on time?

~ Nailed by Ericka ~
No comment yet

Go Pink!

The school I teach at has also adopted Pink October. During this month, the student council has planned different activities to raise awareness about breast cancer. This past weekend, the students dressed in pink at school and football game to show support. Along with wearing pink, I decided show my support through my mani. With a little tape, some luck, and a lot of time, I was able to create what looked somewhat similar to the Breast Cancer Awareness Ribbon.

To complete this mani, I started by painting all of my nails (except the ring) with China Glaze - Rich and Famous. I put on 2 coats to achieve a level, finished look. On my ring fingers, I used Ulta - Encore Pink. Once this dried, I used OPI - Alpine Snow to stamp a plaid design on these 2 fingers. The stamp was one of the designs off of the BM 60 plate.

Once all of my nails were dry, I started attempting to cut out ribbon designs with a razor blade and cutting mat. I probably attemtped about 10 different ribbons before getting 2 that I liked. I put the tape ribbon on my ring fingers and painted over it with Rich and Famous. Once the tape was peeled off, I was left with a plaid ribbon that really stood out!


Outside in the sunshine


Breast Cancer Awareness Ribbon

Overall, I was really impressed with the final outcome. Although I've done tape mani's in the past, this was the most intricate design I've ever attemtped. I was pretty pleased with myself :)

Don't forget to enter our Giveaway!

~Nailed by Ericka~
2 comments

Fall French

With the cold weather rolling in, it finally feels right to break out the darker colors. I decided to try out some of the colors I picked up at Ulta last weekend. I started out with a base coat of Ulta - Femme Fatale. I used 2 coats, although I probably could have stopped at just one. I really loved the color and the finish. It had such a subtle hint of purples and reds.

In order to spice it up a little bit, I added a French tip with Ulta - Chic Peek. I resorted to tape to help keep my lines neat and clean. I liked the way this color classed up the look, but wasn't too much to distract from the Femme Fatale.

I was actually lucky enough to catch a bit of a sunny day to photograph these in. The sun is quickly fleeting in Ohio so when the sun is out, take advantage of it!

Shade
Hello, Sunshine!!!

Hooray for the rays!

Heads up to our readers: We only need 2 more followers until we host our very first giveaway! If you're reading, but not following, join and let us know you are out there!

~ Nailed by Ericka ~
2 comments

Triangles

Since returning from West Virginia on Monday evening I've worked approximately 40 hours in slightly less than 3 days. I slept for 11 hours strait today and I'm still exhausted so I'm keeping it short today. I did these nails a few weeks ago and have been saving the photos to share.


The triangle design is something I've seen a few places and it looked easy enough, even for someone with limited skills such as myself. After a few weeks of putting it off (tape mani's are super time consuming for me for some reason) I decided to give it a shot, and it was easier than I expected.


I started with a base coat of ORLY 'Its Up To Blue' and put a coat of Finger Paints 'Art You Wondering' on top. I actually wore that for a day or two and when the tips started to wear went for the triangles. I placed 2 pieces of tape to form the triangle then painted the whole remaining area with Rimmel 60 Seconds Vinyl Mirror 'Metallic' and then a layer of Seche Vite. When that dried I moved the two pieces of tape up and painted another triangle in ORLY 'Vinyl'. Then I topped it all off with another coat of SV.


I was pretty pleased with how these nails turned out and how simple the manicure it was. I loved the color combination and i'm looking forward to trying this with other colors.
~Nailed by Jen~
2 comments

Green With Envy

Previously this summer, I tried out a diagonal tape mani while on my Alaskan cruise (check it out here). I loved the way the diagonal added a little excitement to the nails. After seeing Jen post her Orangey Red Nails, I knew that I had to share the mani I did this past weekend using this same technique.

As Brittany mentioned, we found some great deals at T.J. Maxx. I picked up the Color Club Poptastic Collection. The colors are bright and bold and I love them. I have been wanting to try out the green one, but needed a way to wear it. Since I don't usually wear greens (especially lighter, pastel greens), I decided a diagonal tape mani was just the solution!

I started off the mani with two coats of Color Club - Twiggie. This applied great. The color was opaque in one coat, but I added another for good measure :) The dry time was actually surprisingly fast too. Once I was completely positive Twiggie dried (tape can destroy a nice base color), I added my destick-ified tape pieces. I layered on Wet N' Wild - SaGreena the Teenage Witch. It had just enough shine to even out the pastel base. I was really pleased with the look and have decided that green is a color I will have to give a chance more often.
Taken outside in the sunlight
In the shade. You can really see my "oops" on my middle finger... 

P.S. Keep following us! Once we reach 25 followers, we will have a giveaway :)

~ Nailed by Ericka ~
6 comments

Cheshire Cat

Probably about a month ago, I found a tape mani on Chloe's Nails that I loved. I've done a few attempts at this design, experimenting with the colors and rays. I decided I wanted to try out Ulta - Little Black Dress and Brittany wisely advised me that Pure Ice -  Peony would look great with it. She was right! I just started cutting tape and putting the rays on in a pattern. For some reason, I struggle with scissors and failed at cutting tape into equal pieces. Oh well!

Here's the results... By the time I remembered to take a camera with me, it was dark outside. These were both taken with a flash outside.


As soon as I was done painting my nails, I had the thought that these reminded me of the Cheshire Cat from Alice in Wonderland. But I couldn't exactly remember what that darn cat looked like. Being as resourceful as I am, I used the ever reliable Wikipedia to look him up (I saved you the hassle... click here if your childhood memories are failing you as well!) Okay, so not an exact match, but he's different than I remember, and I still stand by my claim :)

~ Nailed by Ericka ~
1 comment

Wham... bam...pow! Explosion!

Although many people may have doubts and criticisms of the wonderful city of Cleveland, I can proudly say that I was born and raised in this concrete jungle. Currently, I only live a short drive out of the city and still can enjoy the wonders that downtown Cleveland has to offer. Not only does Cleveland have some really awesome tourist attractions (The Rock and Roll Hall of Fame for example), we also have tons of cultural events hosted year round. I'll be the first to admit that I may not have always seen the beauty Cleveland had to offer (kind of like that saying "can't see the forest for the trees"), but as I've grown older I've learned to appreciate this great city of mine.

That being said, this is not a public service announcement to increase tourism to the Cleve, although the city could desperately use your money ;) I'll leave the convincing to this lovely tourism video. The real reason I'm telling you all of this is just to introduce the inspiration behind my current manicure :) Right now, The Avengers is filming in downtown Cleveland (really close to where Brittany works... honest, ask her about it!). Super heroes, super famous people, super tight spandex outfits. Sounds like a success to me.

Jane at Nailside had done a manicure that she called Explosion (check out her post here). I thought this reminded me of comic book speech bubbles and coincided with the filming of The Avengers. I used China Glaze - Frostbite, China Glaze - Turned up Turquoise, and Wet N Wild - Silvivor along with a lot of tape to complete this look.

Taken outside in natural light

I wore this mani to school today for our last teacher work day and didn't get a chance to photograph it beforehand. Forgive me for the tip wear... I had a lot of cleaning to do before the students come back!


~ Nailed by Ericka ~